
Accounts Receivable – Entry screen
The A/R invoice entry program has a header and a detail that shows the description of the charges. The header has 4 sections, each one containing a piece of information. The section on top has the control number field, the company under which the invoice has been or is going to be created and the period. Next you will find the section of the customer information, with its number, name and location. The next little section contains the information of the date in which the invoice was created, the terms and the due date that is calculated based on the terms of the customer
Then you will find the fields showing the job, the Bill of lading and the invoice numbers (this invoice number is the invoice of your customer), or could be the reference number assigned in a bill of lading, if the invoice was created from a traffic posting. The program automatically assigns the G/L account and it is taken from the account receivable number that was assigned in the accounts module in the company set-up program. The last field is the department, which is related directly to the customer and the port (if it is a traffic invoice). It can be changed if needed, as long as the user has the appropriate security level.
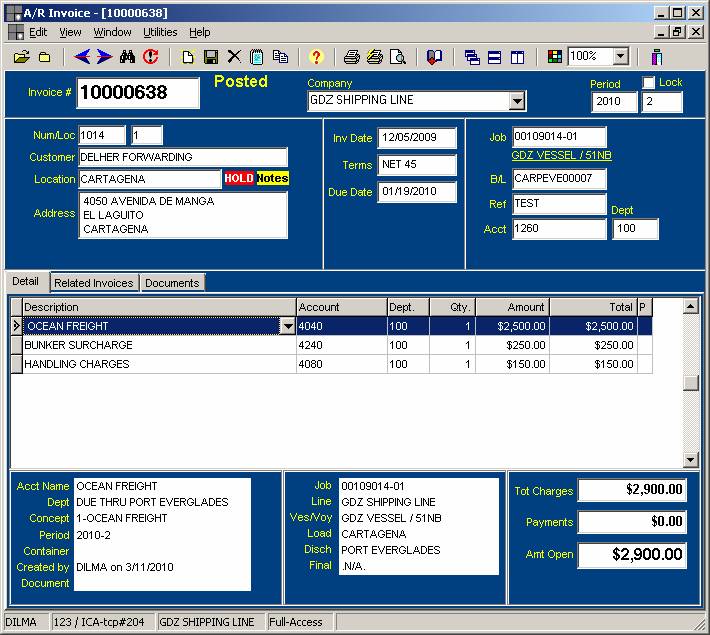
The detail of the invoice contains a detailed description of the charges, the respective accounts, the department, and the amount. The last column shows whether the line item is posted or not. When one of the line items is highlighted a more detailed description appears in the section below.
On the bottom, the window shows the username, the station, the company and the security level of the user
At the moment of creating the invoice, all the header section fields have to be filled out. There are some fields that have additional lists that can be accessed and information can be selected from them. They are sort of reminders. These fields will show a little hand, when the mouse is on them. It is the case of the Job number and invoice fields
The user can pick the receivable department and the program will associate this number to the customer that is being used. The next time that this customer is used, the program will remember the department number and will assign it for you. This can be changed, even if the invoice is posted.
At this point the system will assign the next available control number.
In the detail, the description field can be populated manually or by selecting the charge\concept from the dropdown list. If a concept is selected, it will automatically assign the account that was assigned in the charge setup table. If it requires a department an additional window will open Then assign the amount. In the bottom of the screen you will find more specific information about the entry you just made.
To post an A/R invoice, click on the corresponding option. It will open an additional window to select the period.
To post a batch of invoices, there is a post program under the Accounts receivable menu, which will allow you to post several invoices at the same time, as long as they belong to the same period
The invoice has an Audit as every
other program in
It is highly recommended to run the proof reports before posting. Once the invoice is posted, no changes can be made on the line items, you can only adjust by adding new line items, entering the description, the account, department, quantity, and either additional amount (to add charges) or a negative amount (to subtract charges). The total will be adjusted, and the invoice must then be re-posted to distribute the charges to the general ledger. *Note: Only a manual invoice should be changed in this manner. An invoice created through a traffic post (B/L) should be adjusted in that B/L’s rating and reposted (which will automatically adjust the invoice).
Audit security levels users have the ability to change the customer on the invoice, once the total amount posted in the invoice is zero.
Use the menu and the icons on top to open other invoices, to print, to save changes, to Find invoices, to tile and organize the windows that are open, to copy the invoice, add specific notes or to exit the invoice